The second row of logs are pinned down with rebar. 1/2” this year…two years ago the engineer said use 5/8”…which was twice as hard to pound in with a sledge hammer. Not sure why the change of heart but we are glad for the smaller diameter rod. Placed every 4’ a 1/2” hole is drilled through the top log only…a length of rebar is chosen that will reach through the top log and penetrate into the second log half way. For example…if your top log is 12” and your second log is also 12” you will need an 18” length of rebar to correctly pin your log. Once the rebar is in the log will begin to shrink around the bar and form a very strong connection. Again…I said SHRINK…not SETTLE. I have a stack of over 500 pieces of rebar in varying lengths. I chose to have them cut at a small expense…you can save money and cut them yourself with a bolt cutter if you choose. The corners have extra rebar…one horizontally and one at a diagonal. We do quite a bit of knot cutting once the log is up and we find the right ‘fit’. Remember, this technique is called BUTT AND PASS. One log passes past then the next butts up against that one and passes on the opposite end…and so on and so on…
Archive for June, 2016
Kara, Kristof and I had fun building a fort out of concrete forms for the GKids. With 6 hinged windows and doors they had great fun as was the nautical wheel and periscope. Next will be a loft and fireman’s pole to slide down. Our river is great for activity and of course a campfire and s’mores are just a must have.
The most exciting row and definitely the most effort. Since it’s the ‘sill’ row(first) it needs to be attached to the foundation wall by 3/4” AT(all thread) in our case. Every 4’. That means that holes need to be drilled at precise locations in order to lower the log over all rods at once. There are different methods for sure but since our AT rods were NOT set in the concrete walls evenly and in a straight line we decided to lift the log over the rods…mark the locations…bring the log back to the ground and drill holes…then pray like crazy. Well, it worked well surprisingly. My strong suggestion is to position your rods in a precise line. Goes without saying I’m sure. You can see all the 2×2′ pads inside the foundation…where the floor posts will be set. We are using 2×8 floor joists as floor bracing. Milled lumber will be easier for floor level.
Father’s Day was great this year. Besides hearing from my kids during the course of the weekend we spent the day with some friends from church. We went to their parents home out the Wynochee Valley and watched the last NBA playoff game between Golden State and Cleveland. Kristof and I were rooting for opposing teams so that made it even sweeter…since my team came away with the win. Before the game we drove up river and found a spot to swim…ok…just me and Levi got in because of the cool temp…way to go Levi! Oh yeah…the big smile on Kristof is the fact that he is driving a stick for the first time. Now maybe he can park those Lamborginis.
For a romantic get-away Bonnie and I left early in the morning and headed up the Olympic Peninsula towards Solduck Falls. This was where I proposed to Bonnie seven years ago. After spending some time at the falls we decided to keep heading west and completed the complete circle of the Olympic Peninsula. We stopped for dinner at Klaloch Lodge and saw some wonderful Washington coastline.
To lift our logs onto the foundation stem wall we use lifting poles. One in each corner. Buried 3’ into the ground and extending longer than your highest wall log. In our case we needed poles reaching over 24’ into the air. Once in place and buried you’ll need to climb up as far 20’ and double wrap chain to hold the upper pulley. Above that you’ll need to tie two lengths of rope that will stretch out like a circus tent at angles to hold the poles from bending to far inside. Then you’ll need two more ropes extending from top of pole to bottom of next pole over to provide more lateral support. Anyway…lots of stinking rope! First year I used 1600’ of 5/8” poly rope and this year I’ve gone through over 500’ more. Cheaper than a boom truck! $125 for a spool of 600’. We started to build a form for a sidewalk around the foundation but went with a layer of gravel instead. We have used 6 sets of pulleys to lift our logs. Most of my pulleys I found at garage sales, eBay and just getting the word out. You’ll also need lots of lengths of chain…with hooks on each end preferably.
OK…we have a composting toilet…but when a big crew was on site there were just too many bodies to keep up. So since we had a gravity fed septic installed in 2015 we have looked forward to the day we had our own flush toilet. I designed a privy directly over our septic tank…so the plumbing was short and direct. I had obtained a 300 gallon water container in 2014 but had never really put it to use. We laid some log posts…put 2×8’ foundation forms on top for the floor. Another garage sale landed me a pile of lumber already cut to form up a building. In 2 hours we had our structure. Jeremy was here for a week and not only built a heavy duty stand for the container but also installed the toilet and did the plumbing. Thanks Jeremy! We will remember you every time we flush! BTW…Jeremy was a huge help here…he fixed pretty much everything I gave him…one was my chainsaw pull cord. One issue was the connection to the container. Hardware store didn’t have the correct size so our friend Dave who was visiting that day used the next best thing…a rubber glove. Since its a low pressure system it works just fine. I love hillbilly fixes!
Adding a window in the loft was priority. Light and breeze would be important this summer. We waited a year to make the opening to allow the logs(green when stacked on the foundation in 2015) some time to shrink. Let me make one thing clear. It’s the experience of Jack and Sharon…Onalaska Log Building School…that green logs will SHRINK…not settle…when built with rebar as connections. And that would be 32 years of experience…and 11 log buildings on their own property. Since our garage is now almost two years old we are ready to add any openings we’d like. There is a huge ‘rush’ when you crank up a chainsaw and start aiming it at your nice log wall! Plum was established and a piece of straight lumber was used as a straight edge. Vertical cuts are a piece of cake…holding the saw horizontal was a different matter. I guess that is where chinking covers gaps. Bonnie and I picked out a nice window from a local surplus store for $70.
Our plan has always been to utilize the loft in our garage. Time to move out of our pop-up trailer and move ‘up’ to the loft. Neal, Kara, Stan and I spent a few days laying out the 2x6TG lumber. Finished the floor with four coats of indoor floor seal. The stairs stretched out our ability to do math…but all is good. I still need to put in railings and balasters. I’ve decided to go with 4″ trees from our property instead of boring 2x4s. It sure is nice to be able to spread out in the loft. Next will be a bed frame also made of logs. I can’t get enough of all this…building things from trees…whoohoo!
OK…hang on to your chainsaws! I have caught up with my media organization and am planning a barrage of posts in the next week. These photos are from the first days on site. Moving out of our pop-up trailer and into our newly built loft in the garage…temporary of course. Enjoy!
-
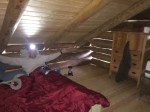
- New loft complete with cracks in the logs still for AC.
-

- More room to stretch out.
-
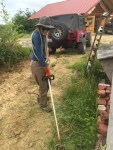
- Bonnie is pretty good with that mean weedwacker.
-

- A bald eagle came to watch us for a half hour.
-

- Kim had some furniture for our new digs.
-

- Alaina had a blast on the tractor.
-
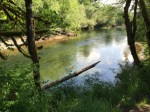
- River view.
-

- Maybe our favorite time of the day.
