Archive for July, 2016

Second Floor Joyce Logs

Posted: July 30, 2016 in Stacking Logs

This slideshow requires JavaScript.

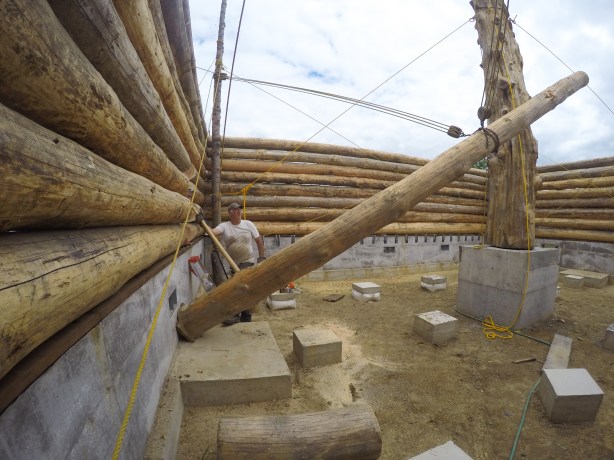
OK…here are a set of wonderful photos.  The second floor.  Fourteen 8” logs spaced 24” apart to be used to lay 2x6TG(tongue and groove) flooring on soon.  I will attempt to have the patience to give you some details I think will be interesting. (It is 95 degrees outside and I am happy to be at the Flippin’ 50’s in Elma Washington eating their great food, using their AC and enjoying great hospitality). 

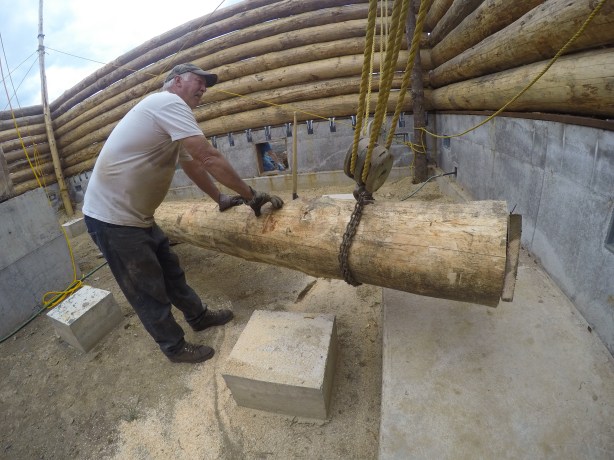
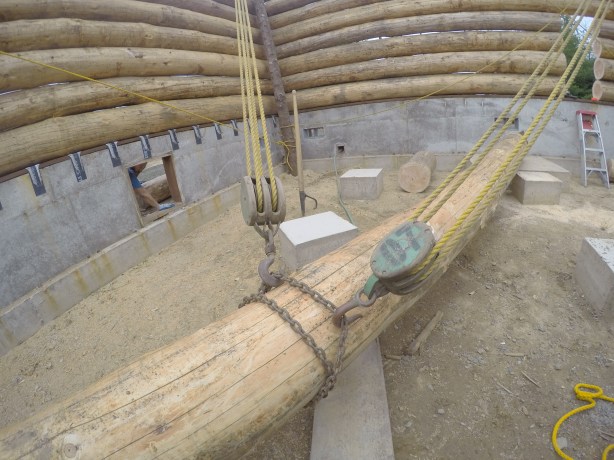
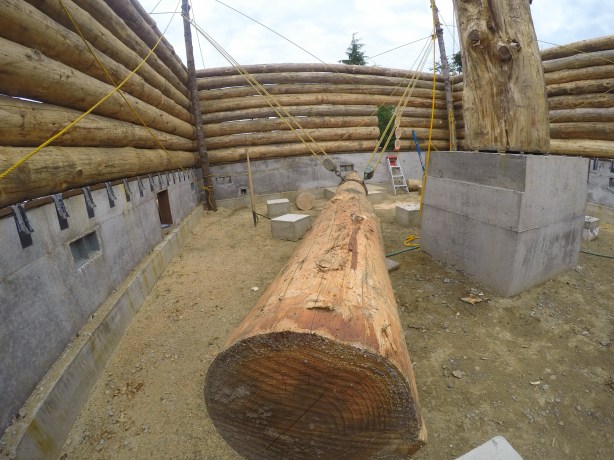
My last post showed placing the joyce beams.  Those two logs go east/west.  One is lagged to Big Red and the other is place halfway between the south wall and Big Red.  We use 5/8”x 14” lag screws.  Now the joyce logs are pulled up on the south end and drug north to span the two beams and the south wall itself.  Are you with me?  Jack(of the Onalaska Log Building School) cut these logs long so we could use the portion that fit best.  So Kara and I measured the diameter of each log and found the 8 1/2” point on each log and made a mark.  We then pulled each log to this mark to the beam lagged into Big Red.  That way we should be very close to level with all fourteen logs…important when we add the 2x6TG dimensional lumber for our floor.  Are you still with me?  We then lagged each log secure.  I found $10 sheets of 3/4” used plywood on Craigslist and bought 30 sheets to make a temporary floor.  My sister Kara helped screw them down.

Rows 7-8

Posted: July 28, 2016 in Stacking Logs

This slideshow requires JavaScript.

Things are really starting to go UP here!  We are getting close to the height of our second floor so we will be setting our joyce beams across the east and west walls in order to set our Joyce logs for our LOFT. 

Access Door

Posted: July 21, 2016 in Stacking Logs

thumb_IMG_2197_1024thumb_IMG_2199_1024thumb_IMG_2203_1024thumb_IMG_2204_1024

First Ridgepole Post

Posted: July 20, 2016 in Uncategorized
DCIM100GOPROGOPR1094.

Bonnie helps use the Pievy to rotate the log for Jack.

DCIM100GOPROGOPR1120.

DCIM100GOPROGOPR1120.

DCIM100GOPROGOPR1098.

We use a piece of Pressure Treated wood between the log post and concrete because concrete will eventually rot the log.

DCIM100GOPROGOPR1100.

Positioning the north ridgepole post.  Again…no boom trucks were harmed(or used) in the positioning of these logs.

DCIM100GOPROGOPR1102.

Bonnie was always on hand to help in any way she could.

DCIM100GOPROGOPR1103.

This is my new favorite photo!

DCIM100GOPROGOPR1105.

It was a delicate balance of which side to pull in order to lift this center post into position.

DCIM100GOPROGOPR1107.

This center post will be 1 out of 3 logs to hold our ridge pole log up.  Big Red…our center post is in the upper right corner of this photo.

DCIM100GOPROGOPR1109.

Bonnie is on the jeep winch and Rob is on the tractor pulling this post into place.

DCIM100GOPROGOPR1112.

Success!

DCIM100GOPROGOPR1116.

This is my happy face.

DCIM100GOPROGOPR1117.

FYI…the 2′ square footings will hold 4×4″ posts and 4×8″ beams that will hold the 2×8″ joyce milled lumber for the floor.  You can see the joyce hangers along the top of the foundation.

DCIM100GOPROGOPR1120.

I am looking at a wall log that needs to be notched in order for the center post to fit correctly

DCIM100GOPROGOPR1121.

Notching the wall log.

Jack’s Nephews Day

Posted: July 15, 2016 in Stacking Logs

Jack had some relatives visiting from Germany so he brought them over to get the experience of building a log cabin.  By the way…I am open to that for any of you to come over!

This slideshow requires JavaScript.

BIG RED Installed!

Posted: July 14, 2016 in Uncategorized

This slideshow requires JavaScript.

OK…you must be sworn to secrecy…the facts I am about to tell you could damage my reputation and otherwise ruin my day…if too many people find out that I actually USED A BOOM TRUCK…shuhhhhsssh.  You see, from day one most everyone has suggested that we use a boom truck to lift up our logs…”you can’t do all that with just rope and pulleys…that’s crazy!  You need a boom truck”.   So you can see my reluctance to use a boom truck even though it was only used on ONE log.  A BIG one.  BIG RED.  A tree really.  Alas, wisdom got the better of me and in the end I was glad we did it this way.  No friends were harmed in the installation and no rabbits lost their homes.  I think the photos speak for themselves.  Enjoy.

Cement Footing for Big Red

Posted: July 11, 2016 in Uncategorized

This slideshow requires JavaScript.

I purchased a big cedar tree from a mill in Port Orchard WA with the intention to use it as our ce

nter post.  It measured 18’x40”.  It was gorgeous.  Knots and grain everywhere…it looked like a perfect ‘climbing tree’ for the GKids…or at least a beautiful addition to our great room.  My engineer planned for it to have only a one foot thick footing…that would have left almost four feet UNDER our floor.  That wasn’t going to happen so I had a 4x4x4’ footing built so we wouldn’t loose but one inch of tree.  For months I planned just how we would lift this tree into the structure and then stand it upright.  The steel plate on top of the footing had to be boomed onto the footing it was so heavy.  We got a nice campfire pit out of the deal as well.  Kristof was a big help for over a week…Thanks Kristof!  Life up here is not so ‘off the grid’ that we don’t have Netflix with our sat dish and solar footprint.

Fourth-Sixth Rows

Posted: July 6, 2016 in Uncategorized

This slideshow requires JavaScript.

We had some wonderful visitors during our 4th-6th rows for sure.  Jeremy had some friends from FSU traveling by bicycle from Calgary Canada to San Diego CA.  He knew they were biking through WA but had no idea where they were…and they didn’t know he was in WA.  So we pull up to a stop sign and two bicyclists ride across in front of us.  Jeremy goes nuts and yells out the window.  It turned out to be his friends from Florida!  It ended up we invited them up to the cabin where they stayed a few days and helped us chink our garage!  Thanks Jacob and Marcella…it was a ‘win-win’ kinda thing for sure.  We also had a short visit from the Zorns family from Florida.  Shared a campfire and they were off for CA.  We even had a mother and her sons visit from Germany.  I’ve included some close up photos of the chinking on our garage.  First…we waited for two years to chink at all.  That is to let the logs shrink.  We stuffed insulation between the logs first…then we cut 1” strips of 1/4” hardware cloth(fine mesh wire) and wedged them over the insulation.  This keeps boring bugs from boring holes into your structure.  Then we hammered nails at 4” apart and bent them inward for the final layer of chinking to attach to.  You can use several compounds as your chinking…synthetic type material is one…I am choosing to use just plain cement.  It is less expensive.  I will end up using a dye to color the cement.  Note:  Jack has hammered by hand the nails over the years…I am intending to try out a cordless nail gun instead.  That will happen later this summer.  Stay tuned.


Third Row of Logs

Posted: July 5, 2016 in Stacking Logs

This slideshow requires JavaScript.

Pretty exciting to watch the logs go up row by row.  It all happens pretty quick really since most of our lower logs were over a foot in diameter and it only takes one log per side to move on.  Jeremy was still here on a ‘working vacation’ from Florida…thanks for all your help Jeremy!  Swinging an 8lb sledge all day long made Jeremy a believer that building a log cabin was work.  Sam has been a welcome addition to our work force as well.  In a couple of the pics you see Jack and I wedging our saws in between logs cutting off knots that have kept the two logs from fitting together as tight as possible.  The tighter the fit the less chinking will be relied upon for insulation.  1/2” rebar was pounded in every four feet with the exception of door and window locations…then allowances were made so as not to ‘run into’ rebar while cutting an opening at a later date.  All total there will be over 800 pieces of rebar driven into the walls of this cabin.  That is a lot of Icy Hot! 

Ruby Beach Trip

Posted: July 2, 2016 in Family

All work and no play makes Dave a cranky boy.  Jeremy got to try out his new camera.